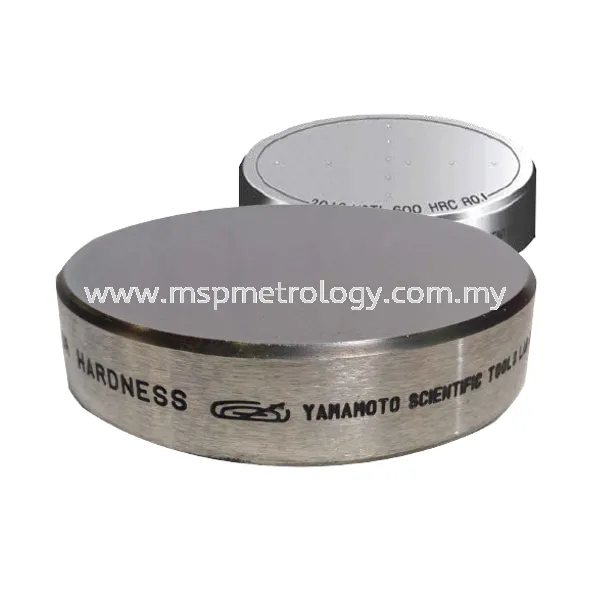
Yamamoto Standard Test Block for Hardness
Brand: Yamamoto
Category: Hardness Accessories, Hardness Accessories
Yamamoto standard test block for hardness standardized to determine the average hardness of the block surface by MSP Metrology (M) Sdn Bhd from Yamamoto Japan
To verify hardness tester to be in good working condition
To control various industrial hardness testers, it is important to verify all related factors, inculiding indenters, static and dynamic loads, indentation measurement, and sample pieces. Hardness blocks allow overall control of this coomplicated factors in the field. Therefore, it is imperative that a uniform surface hardness is displayed by all our test blocks, that the main factors of secular change are eliminated and, if possible, that the characteristic of their materials are similar to those of materials in practical use.
Material and manufacturing process
Yamamoto’s blocks are first cut from a plate material to avoid being affected by center segregation. After machining to the required shapes, heat treatment is carefully applied to the blocks to get a stable microstructure and the required hardness level.
After heat treatment is completed, the blocks are ground, lapped, and then undergo a thorough polishing process, followed by wet buffing to improve measuring precision and achieve the most accurate and consistent hardness available.
Yamamoto Metal Hardness Test Block has been manufactured since 1939 and maintained her reputation as the best in this field. The company received ISO 9001 Quality System certificate in 1997, issued by Japan Quality Assurance Organization (JQA).

1. Regular, Superficial and Special Blocks
2. High precision, precision hardness tolerance
3. Certified blocks traceable to NIST
4. Calibrated in accordance with ASTM E18-00 section C using NIST Rockwell HRC standard reference material
Features
To verify hardness tester to be in good working condition
To control various industrial hardness testers, it is important to verify all related factors, inculiding indenters, static and dynamic loads, indentation measurement, and sample pieces. Hardness blocks allow overall control of this coomplicated factors in the field. Therefore, it is imperative that a uniform surface hardness is displayed by all our test blocks, that the main factors of secular change are eliminated and, if possible, that the characteristic of their materials are similar to those of materials in practical use.
Material and manufacturing process
Yamamoto’s blocks are first cut from a plate material to avoid being affected by center segregation. After machining to the required shapes, heat treatment is carefully applied to the blocks to get a stable microstructure and the required hardness level.
After heat treatment is completed, the blocks are ground, lapped, and then undergo a thorough polishing process, followed by wet buffing to improve measuring precision and achieve the most accurate and consistent hardness available.
Yamamoto Metal Hardness Test Block has been manufactured since 1939 and maintained her reputation as the best in this field. The company received ISO 9001 Quality System certificate in 1997, issued by Japan Quality Assurance Organization (JQA).

1. Regular, Superficial and Special Blocks
2. High precision, precision hardness tolerance
3. Certified blocks traceable to NIST
4. Calibrated in accordance with ASTM E18-00 section C using NIST Rockwell HRC standard reference material
Specifications
| Assortment | Hardness Value | Tolerance | Calibration Number | Variation (R=Max-Min) | Materials (JIS Notation) | Dimension (mm) | Finished Surface | Standard Based |
| HMV (1, 0.1) | 1650 | ±10% | 4(2×2) | 2% (HV1) | Si3N4 | Ø10×5 | Super Finish | JIS B 7735 |
| HMV (1, 0.1, 0.01) | 900, 800, 700, 600, 500 | ±15 | 6(3×2) | 5% (HV0.1) | SK85 | Ø25×6 | Super Finish | JIS B 7735 |
| – | 400, 300, 200 (Be Copper) | ±15 | – | – | C1720P | Ø25×6 (2) | Super Finish | – |
| – | 100 (C2600P), 40 (C1020-) | ±10 | – | 7(100HV0.1), 4(40HV0.1) | ← | Ø25×5, Ø25×6 | Super Finish | – |
| HMV (0.1, 0.01, 0.001) | 30 (AU) | ±10 | – | 4(HV0.1) | Au | Ø25×5 (0.8) | Super Finish | – |
| UMV (0.01, 0.002) | 900, 700 (Berkovich 9.8mN tested) | ±20% | 6(3×2) | 10% (HV0.01) | SK85 | Ø25×6 | Super Finish (Fine) | JIS B 7735 |
| – (0.01, 0.002) | 500, 200 (-) | – | – | – | SK85, C1720P | Ø25×6 (2) | Super Finish (Fine) | – |
| *Nano Indentation Hardness Blocks | APPROX340 | 6(3×2 HV, Nano) | Syngle Crystal | Ø25×6 | Super Finish (Fine) | JIS B 7735 | ||
| HN-W | HV0.001 | Tungsten | (W:Ø9×6) | |||||
| (HV0.01, 0.001 Berkovich 9.8mN tested) | ||||||||
| HV (30, 1) | 1000(SK120), 900, 800, 700 | ±15 | 10(5×2)/HV30, 10 | 1.5% | SKS3 | Ø64×15 | Buffing | JIS B 7735 |
| HV (10, 1) | 600, 500, 400, 300, 200(SK85), 150(S45C) | – | 6(3×2)/HV1 | – | ← | – | Buffing | – |
| – | 100 (C2600P), 40(C1020P) | ±10 | (150HV and below 2.2% | ← | Ø64×10 | Buffing | – | |
| HS | 100(SK120), 95,90,80,70, 60,50, 40, 30 | ±2 | HV10(5×2) | VHS≤1.5(70HS and below 1.2) | SK85 | Ø64×15 | Buffing | JIS B 7731 |
| – | 20(S20C), 7(C1020PØ64×10) | – | HS10(5×2) | ∠HS(HS-VHS)≤0.5 | ← | – | Buffing | – |
| HL | HLE(Dia)850, 800, 700, 600, 500 | ±15 | (HV Calibration) | SK85 | Ø115×33 | Buffing | JIS B 7731 | |
| – | HLD(WC)880, 830, 730, 630, 520 | – | – | – | Buffing | Related | ||
| HRC | 70(SK120), 67, 64, 62, 60 | ±1 | 10(5×2) | 0.2 | SKS3 | Ø64×15 | Buffing | JIS B 7730 |
| – | 57, 55, 50, 45, 40, 35, 30, 25, 20, 10 | – | – | (40HRC and below 0.3) | SK85 | – | Buffing | – |
| HRA | 87, 85, 83, 81, 78, 75, 71, 65, 56 | – | – | 0.3 | Same as HRC | – | Buffing | – |
| HR30N | 83, 81, 78, 73M 67, 60, 55, 50, 41 | – | – | 0.6 | – | – | Buffing | – |
| HR15N (45N) | 92, 90, 87, 85, 80, 75 (43) (23) | – | – | – | – | – | Buffing | – |
| HRBS | 100, 95, 90 | ±2 | 10(5×2) | 0.8 | SK85 | Ø64×10 | Plate Lapping | JIS B 7730 |
| – | 82, 72, 62, 52, 42, 32 | – | – | (50HRB and below 0.1) | C2600P | – | Plate Lapping | – |
| HR30T S | 78, 72, 62, 52, 42, 38, 32 | – | – | 1.0 | Same as HRB | – | Buffing | – |
| HR15T S | 87, 82, 78 | – | – | – | – | – | Buffing | – |
| HR (E•M•L•R•F•S) | HRE90 HRM107 HRL118 HRR123 HRF90 | – | – | – | (100HV) | – | Buffing | JIS K 7202 |
| – | HRM67 HRL92 HRR105 HRS90 | – | – | – | (40HV) | – | Buffing | – |
| HBW (10/3000) | 600, 550, 500, 450, 400, 350 | ±15 | 6(3×2) | 1.5% | SK85 | Ø115×18 | Fine Grinding | JIS B 7736 |
| – | 300, 25, 229(d=4mm), 200, 180 | – | – | – | – | – | Fine Grinding | – |
| HBW(10/3000) 150, HBW(10/500) 125 | – | – | 2.5% | S45C | – | Fine Grinding | – | |
| HBW(10/500) 100 | – | – | 3% | S10C | – | Fine Grinding | – | |
| HRC | 67, 64, 62, 60 | ±1 | 6(3×2) | Ø50.8×6.4 | (ASTM E-18) | |||
| HRC | 55, 50, 45, 40, 35, 30, 25, 20 | (Ø2″x1/4″) | ||||||
Inquiry - Yamamoto Standard Test Block for Hardness










.png)
